Pentel Water-Soluble Oil Pastels: A Beginner's Guide to Overcoming Fear


"Did you buy that beautiful little box of Pentel water-soluble oil pastels, but it’s just sitting in a drawer because you don't know where to start?
Your worries are over!
In this lesson, I’m going to explain how this medium works and teach you how to unleash your imagination and overcome the fear of getting started. Let's do this!
MATERIALS LIST: What will you need?
Before opening your case, set up your workspace.

Pentel Aquash Water-Soluble Oil Pastel Set (obviously!);
Suitable paper: Watercolor or mixed media paper (at least 250 to 300 gsm so it won't warp). There are several budget-friendly options available. I recommend Canson XL Aquarelle or Canson Montval cold press (grano fino), as the surface is smoother and the pastels glide better. (Avoid the Graduate line, as its surface is too rough and the paper quality is terrible);
Brushes: The Pentel Water Brush (a brush with a built-in water reservoir) will change your life forever! You can also use Neo-Sable brushes as a complement;
A jar of clean water and paper towels (to clean your brush);
Pencil and eraser (for a light initial sketch);
INTRODUCTION: What is a water-soluble oil pastel?

Water-soluble oil pastels are a fantastic hybrid art medium: they combine the convenience and texture of pastel drawing with the fluidity and transparency of watercolor painting.
Visually, it looks just like a regular crayon or a standard oil pastel stick, but the magic lies in its composition.
How does it work?
Unlike regular crayons, which are wax or oil-based and repel water, water-soluble pastels are made with pigments bound in a water-soluble base.

This means you can use it in two different ways within the same artwork:
Dry: You draw on the paper normally, creating strong, textured strokes and highly vibrant colors.
Wet: When you run a wet brush over those strokes, the pigment dissolves instantly, transforming your drawing into a watercolor painting with smooth gradients and transparencies.
Enough talking, let's get our hands dirty!
TESTING IT TO OVERCOME YOUR FEAR:

Whenever I buy a new medium, I use this testing technique to overcome that little fear of getting started and to understand how it behaves. You’re not going to be an expert with a material you’ve never used before. Even with the ones I've used in the past, I still test them to refresh my memory on how they behave.
First, take all the pastels out of their pretty box. Pick them up one by one. Look at the color and read its name. Don't put them back in their neat little box just yet. This will help you get familiar with the material.
This is a great way to shake off that "brand-new material" intimidation. It might sound silly, but it helps a lot.
Since we have water-soluble oil pastels in our hands, they need to be tested in both main ways: as oil pastels and as watercolors.
FIRST TEST: Creating a Color Chart

On a sheet of paper, swatch the same color twice, side by side. The first one will show you the true color of the pigment, while on the second one, we’ll run a wet brush over it to see how the color looks when activated with water. It’s completely normal for the color to become more intense or softer after the wash. So, we need to know how it will behave.
This color chart will be your best friend. You can even tape it to your wall so it’s always within eyesight.
SECOND TEST: Blending and Gradients
Dry pastel + dry paper: getting to know the raw pigment.

Dry pastel + dry paper: activating with water afterwards.

Wet pastel + dry paper:

Dry pastel + Wet paper:

Wet pastel + Wet paper:

Scraping the pastel and mixing colors: creating a makeshift palette.

"Scribbling in the puddle": using your pastel as watercolor
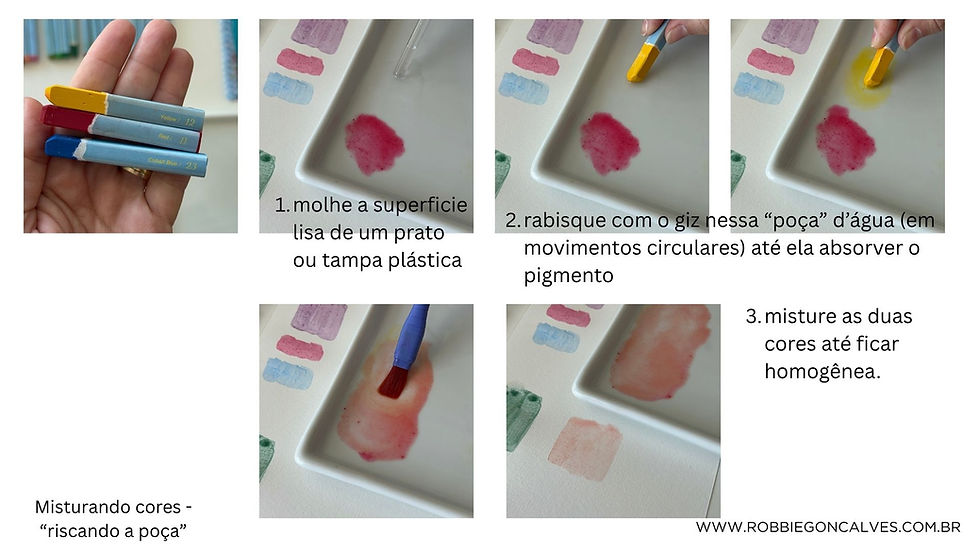
And there you have it! Now you also have a guide on how this medium behaves in many different ways.

THIRD TEST: COLOR BRUSH PENTEL

You can test your water-soluble pastels with any type of medium, but my favorite is the Pentel Color Brush. They are just like a Water Brush, but instead of water, they already have ink inside the reservoir. (I’ll talk more about the Pentel Color Brush in a future lesson).
So, one medium complements the other when it's time to create.


The most fun part is that you can test them with any material you want to truly understand how they behave. That way, you can discover how to use them together.
TÉCNICA SECRETA DE ARTISTA PROFISSIONAL: ÓLEO DE LINHAÇA

Pentel water-soluble pastels also share a similar characteristic with traditional oil pastels. For this reason, we can use this specific oil painting technique.
Linseed oil (artist grade) is a medium used in oil painting to make the paint more fluid. However, it cannot be used in large amounts, otherwise the oil paint will lose its core properties.
I’m going to show you how linseed oil can be used with Pentel water-soluble pastels.


MOST COMMON MISTAKES TO AVOID:
Using regular printer paper: The paper will tear and turn into mush. Invest in high-weight paper.
Too much water: If you soak it too much, the pigment will vanish and the paper will warp. The secret is a damp brush, not a dripping one.
Trying to erase after wetting: Once the water dries, the pigment fixes into the paper. Make a very light pencil sketch beforehand.
THE BEGINNING OF CREATING YOUR WONDERFUL ART:

Here is a tutorial on how to create a piece of art to better understand the practical use of everything mentioned above!
Let's do this!


YOUR HOMEWORK:
We encourage you to share your work and experiments online on Instagram. Tag @robbiegoncalves and @pentel_brasil to connect with other creatives. Your work might inspire someone else!
I hope you enjoyed this tutorial.
More coming soon!
With love,
Robbie.


Comments